| * | A fighting technique: the ladder | |||||||
| In 'Middle Game 1', we learned to aim at the centre and build influence in middle-game fighting. | ||||||||
In an actual game, the opponent will naturally be playing with the same aim in mind, so it won't be easy for just one side to expand his sphere of influence. As a result, we get hand-to-hand fighting in which the stones come into contact with each other. Well, let's learn some of the techniques for winning these contact fights, that is, basic ways of capturing enemy stones. |
||||||||
|
||||||||
| * | The ladder | |||||||
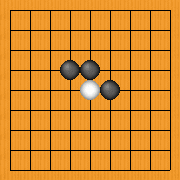
| Dia. 1. There's a sure way of capturing the white stone. Where should Black play? | ||||||||
 |
||||||||
| Dia. 1 | ||||||||
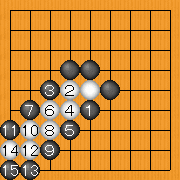
| Dia. 2. Black gives atari with 1. If White flees with 2, Black ataries again with 3; if White flees with 4, Black ataries with 5. In this way, Black keeps giving atari and finally drives White into a corner, capturing all his stones with 15 in the end. This technique is called the ladder. | ||||||||
 |
 |
|||||||
| Dia. 2 | ||||||||
| * | Failure | |||||||
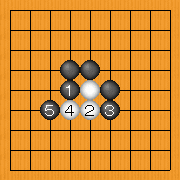
| Dia. 3. If Black ataries with 1, then after White escapes with 2 Black
has no way of giving atari with 3. Black has to set up the ladder in such
a way that he can keep giving atari each move. |
||||||||
 |
||||||||
| Dia. 3 | ||||||||
| * | How to set up a ladder | |||||||
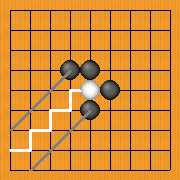
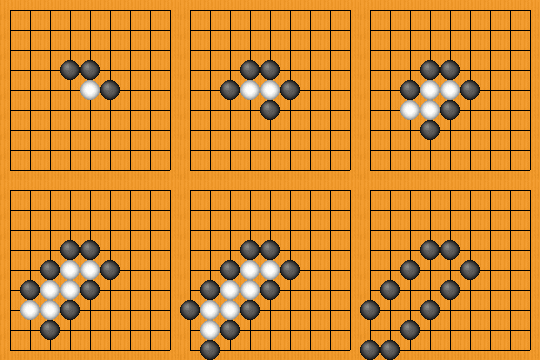
| Dia. 4. Look carefully at the order in which Black plays to create a ladder. | ||||||||
 |
||||||||
| Dia. 4 | ||||||||
As you can see, White is always in atari, so he is trapped by Black. |
||||||||